3 Collaboration in Git
This chapter presents how to work with Git, GitKraken, and GitHub.
In general, Git is a version control system to track changes in text file (e.g., do-files, R scripts, csv, etc) and to share those changes with other people. Git is capable of letting you know whether a binary files (e.g., Word, Excel, PDF, DTA, etc.) has changed, but it won’t tell how it changed. To get the most out of Git, programmers combine it with GitHub, which is a website that to share code with anybody (including people outside the World Bank), solicit improvements via pull requests, and track issues.
3.1 Initial Set up
Make sure you follow the steps below:
Open a GitHub account using your World Bank email account. Here or here.
Install GIT (Optional). This step is optional because the two steps above suffice for working with Git. However, if you get into Git and want to do really advance stuff, you need to work with GIT directly.
Make sure R and RStudio are installed and updated in your computer. Even though we have not decided whether or not to work with R from now on, Rstudio is great IDE that allows us to do a lot of things including GIT management .
3.2 Getting to know Git
Git is a Distributed Version Control System. This means that Git is a system to fully clones the project and in its history into any client’s repository or local computer. Every time you save the state of your project (i.e., commit), Git basically takes a picture of what all your files look like at that moment and stores a reference to that snapshot. To be efficient, if files have not changed, Git doesnât store the file again, just a link to the previous identical file it has already stored. Git thinks about its data more like a stream of snapshots of the whole project. This ability of taking snapshots of the projects is what makes Git to any other version control system. Other systems, like Microsoft Word or any other MS software, changes are tracked at the file level rather than at the project level. People is able to know how files have changes individually, but they don’t know how those files change with respect to the changes applied to other files of the same project.
3.3 Basics of Git
3.3.2 Branching and Merging
Branching and merging are the core of collaborating with multiple people. Branches are used to develop features isolated from each other. The master branch is the “default” branch when you create a repository. Use other branches for development and merge them back to the master branch upon completion. “Git branches are effectively a pointer to a snapshot of your changes. When you want to add a new feature or fix a bugâ”no matter how big or how smallâyou spawn a new branch to encapsulate your changes. This makes it harder for unstable code to get merged into the main code base, and it gives you the chance to clean up your future’s history before merging it into the main branch."1
3.4 Getting to know SmartGit
Installation
Download SmartGit and install it. Download the files into the the folder that you’ll use for installation and NOT into the “downloads” folder. If SmartGit automatically downloads the zip file into the “downloads” folder, then extract it into the folder you’ll install it in. You don’t need admin permissions to install it, but download the Portable Bundle. The installation files can be found here: ‘SmartGit > bin > smartgit.exe.’
Note: (1) During the installation process pick the “non-commercial use” option; (2) Integration with GitHub might be easier if you use the same username and email as that of your GitHub account.
Integration with GitHub
Once SmartGit is installed, do the following to integrate your GitHub account:
Go to ‘Edit > Preferences > Hosting Providers.’ Click the “Add…” button on the top-right of the window.
There are a few ways to integrate. The easiest is to pick the ‘Use OAuth token for repository authentication (instead of password)’ option. This should generate a token in your web browser. Use this token to complete the integration.
Once the GitHub account is added, your GitHub account should be listed in ‘Hosting Providers’ window in SmartGit. You can also check your GitHub account to make sure that SmartGit has been authorized. To see this, in your GitHub account, go to ‘settings > applications.’ You should see SmartGit listed under ‘Authorized Apps.’
You can find the instructions on integration here.
Organize your toolbar
You can add convenient commands to your toolbar from the Edit> Customize > Toolbar menu.
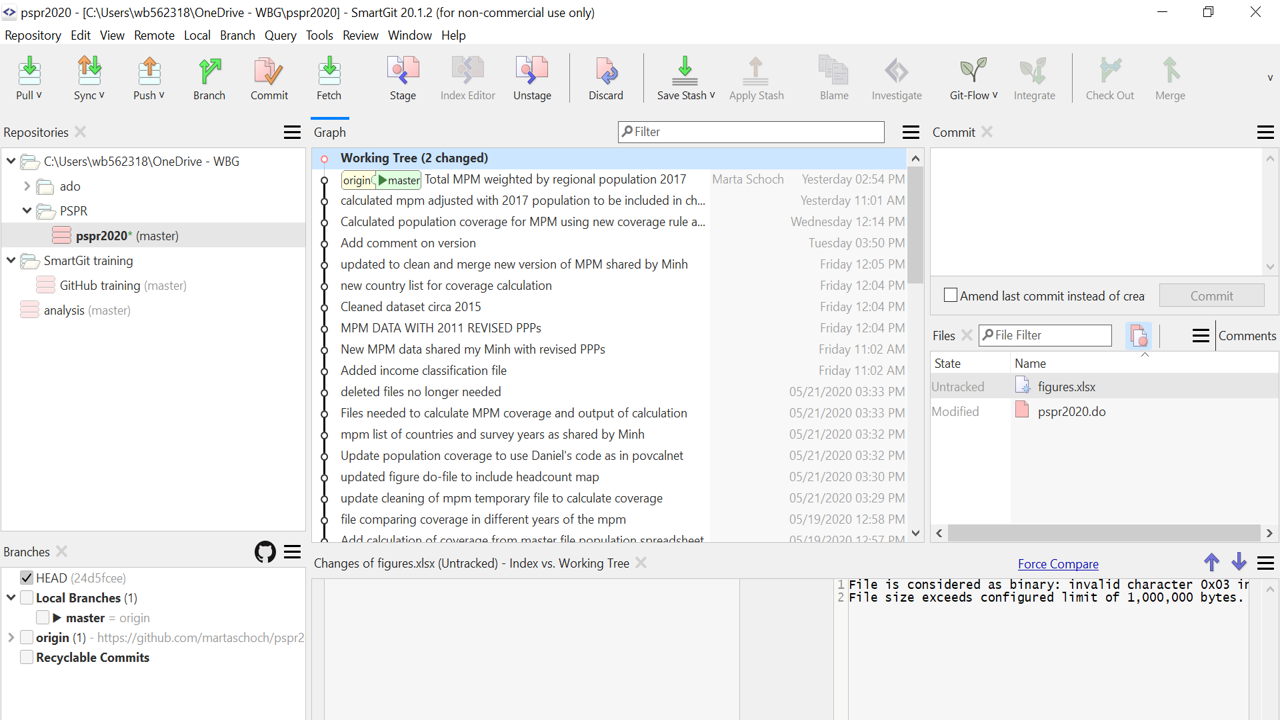
Figure 3.1: Toolbar
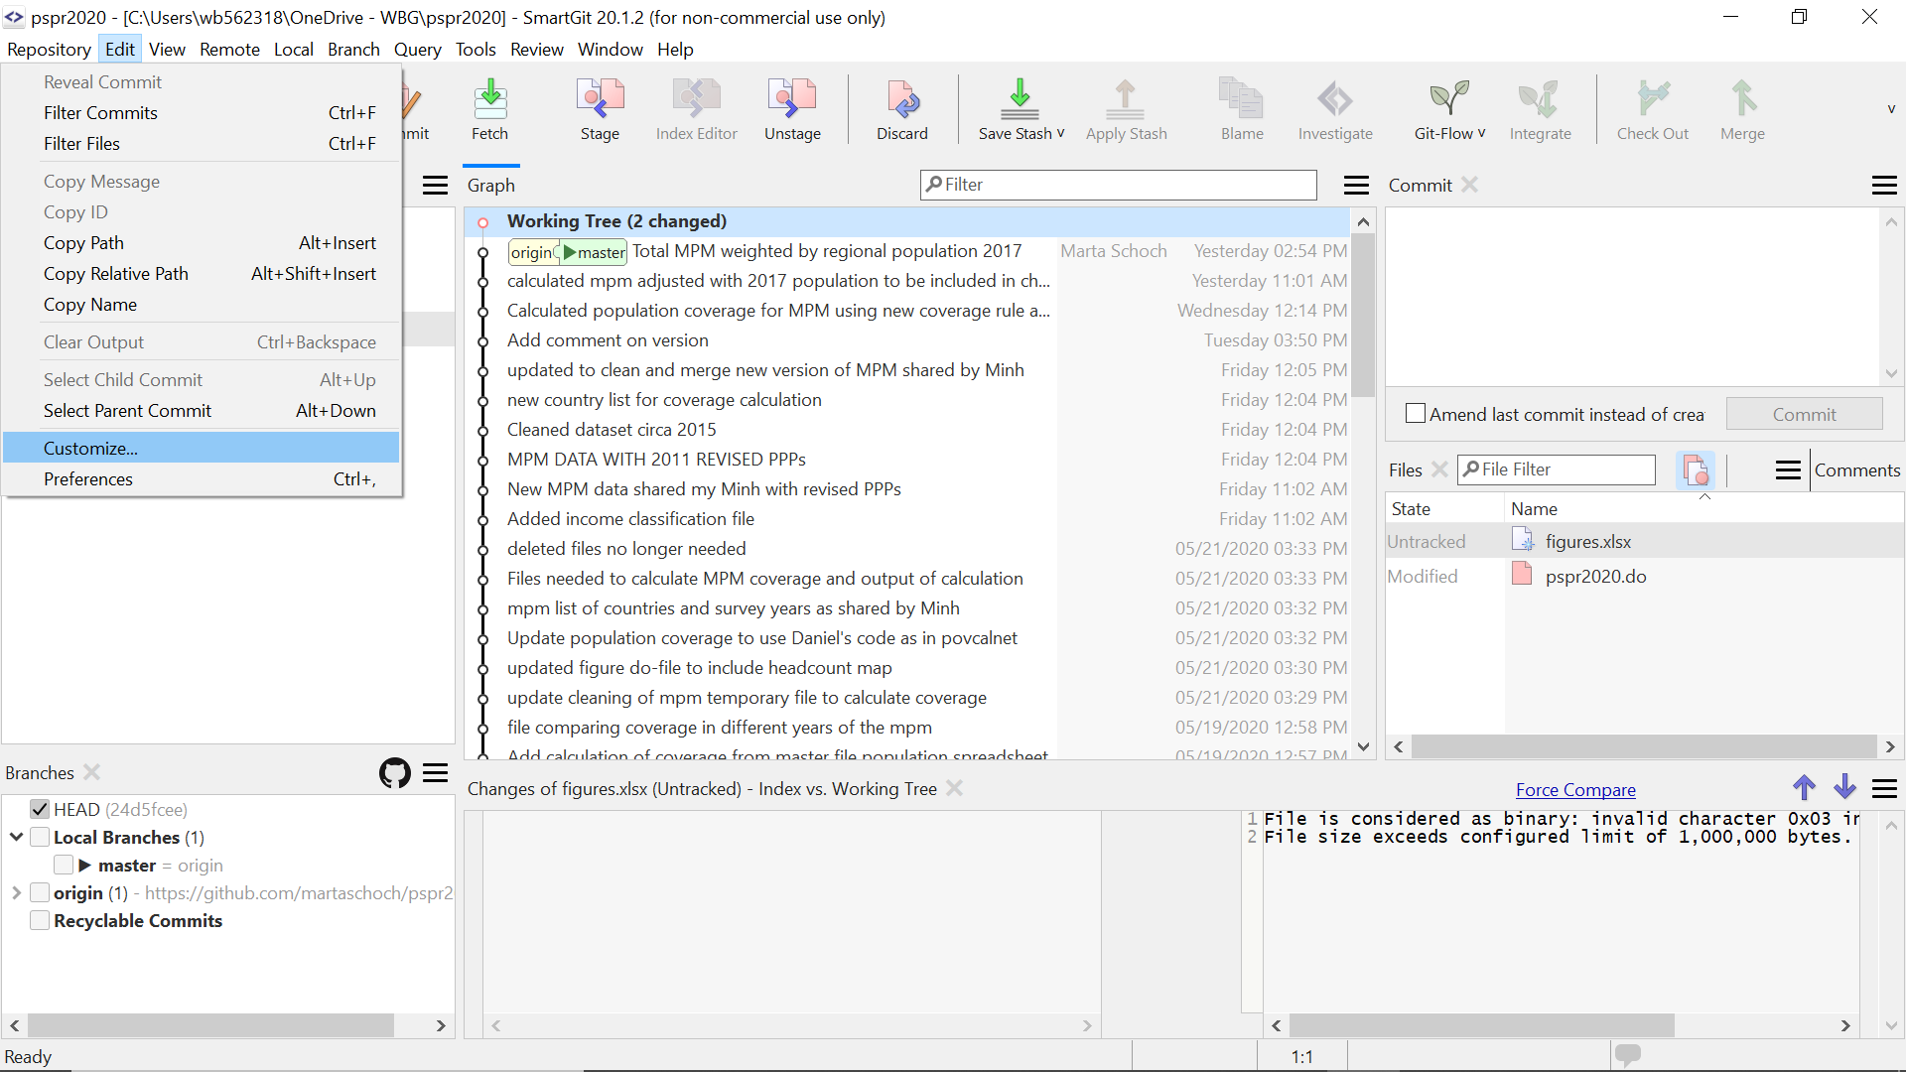
Figure 3.2: Customize menu
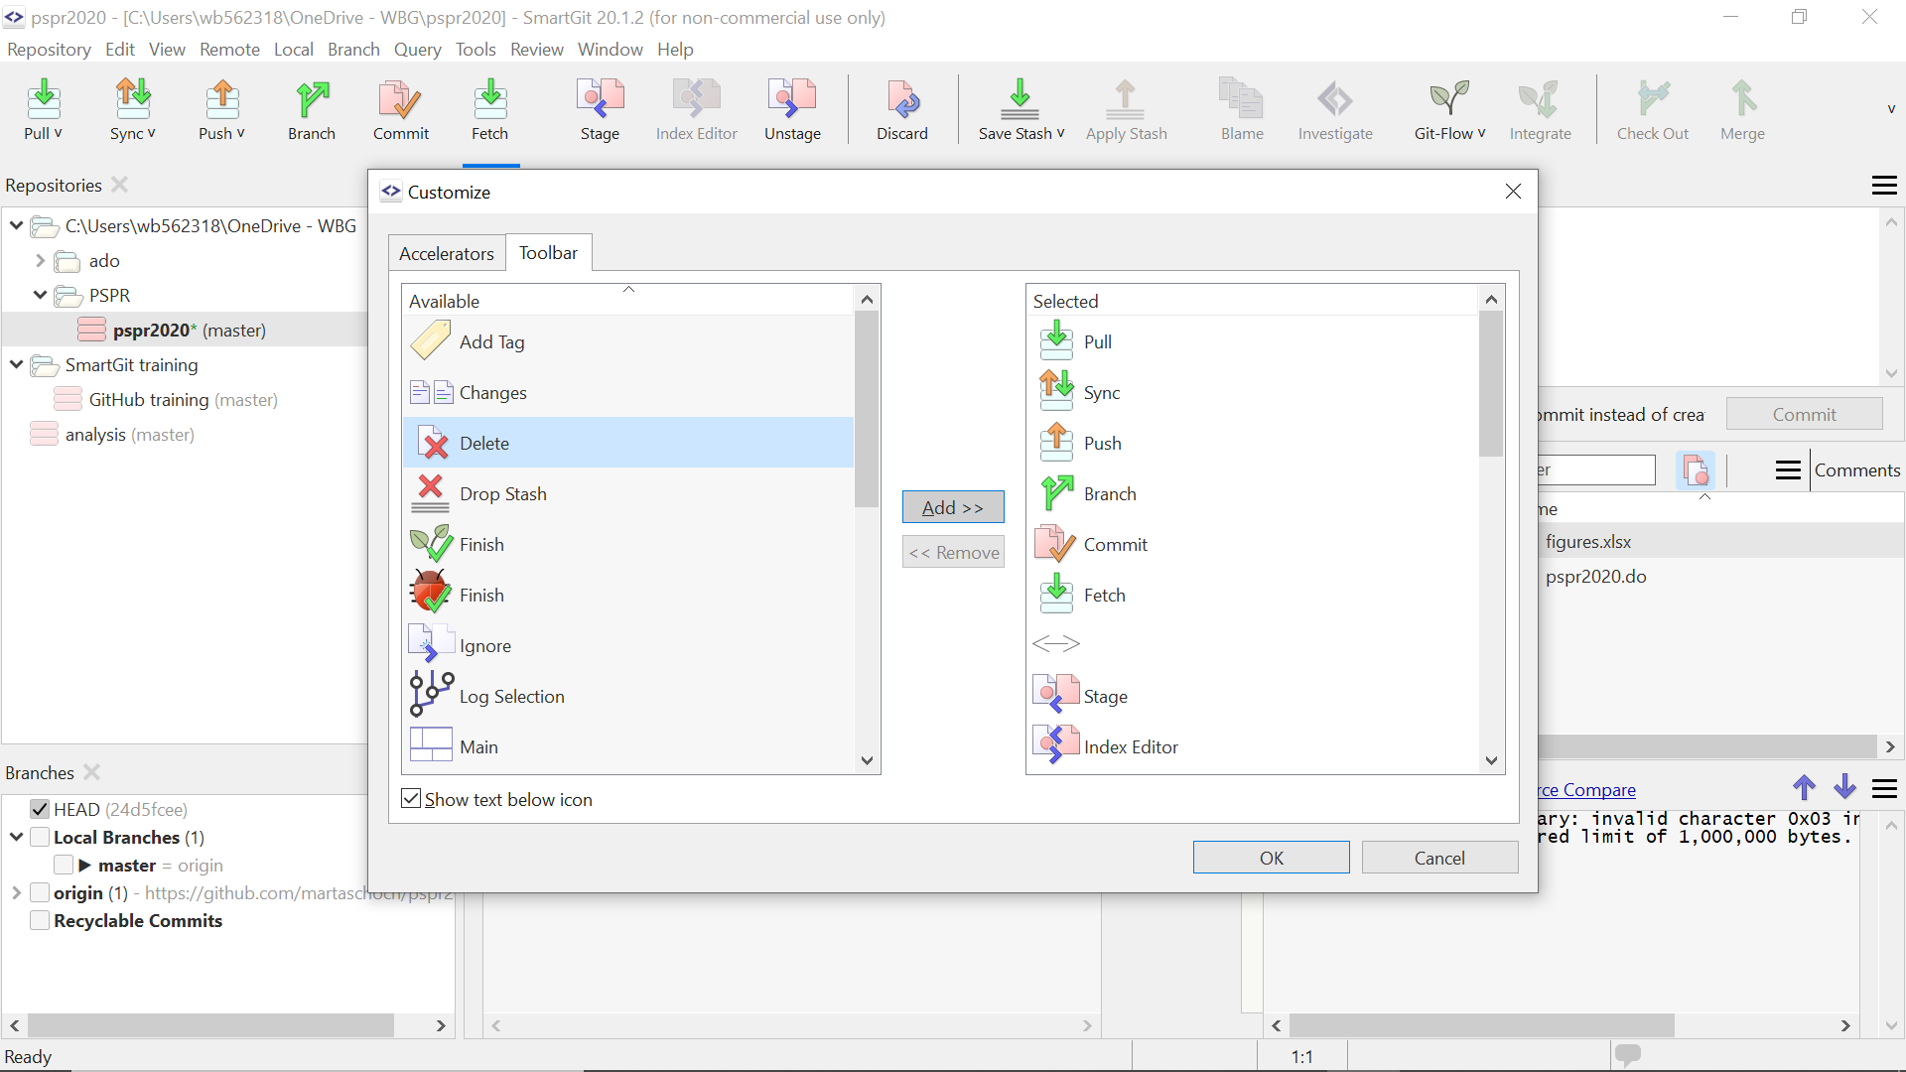
Figure 3.3: Add/delete commands
Initialize Repos
Go to Repository > Add or Create Repository.
Select a folder that you created and saved in your computer (e.g., new_repo).
- Select Initialize.
Clone Repos
Go to Repository > Clone.
Get and insert URL of Git repository you want to clone (e.g., https://github.com/PovcalNet-Team/Povcalnet_internal_guidelines.git).
You could also select from a list of repositories in your GitHub account. Use these steps:
- Click on the drop-down arrow and select github.com from the drop-down menu.
- Select the repository you want to clone from the list of repositories in your GitHub account.
- Specify the local directory for the new repository.
Organize Repos by groups
- Have some repositories that you can put into groups (e.g., GitHub, R, SmartGit, Stata).
Go to Repository > Add Group
Enter the group name (e.g., ‘Version Control’ for GitHub and SmartGit).
- Drag and drop repositories into the relevant group.
How do you link a repository that is your local machine to your GitHub account?
- Set up a new repository in GitHub.
- Enter name of repository, select Public or Private, and do NOT select Initialize.
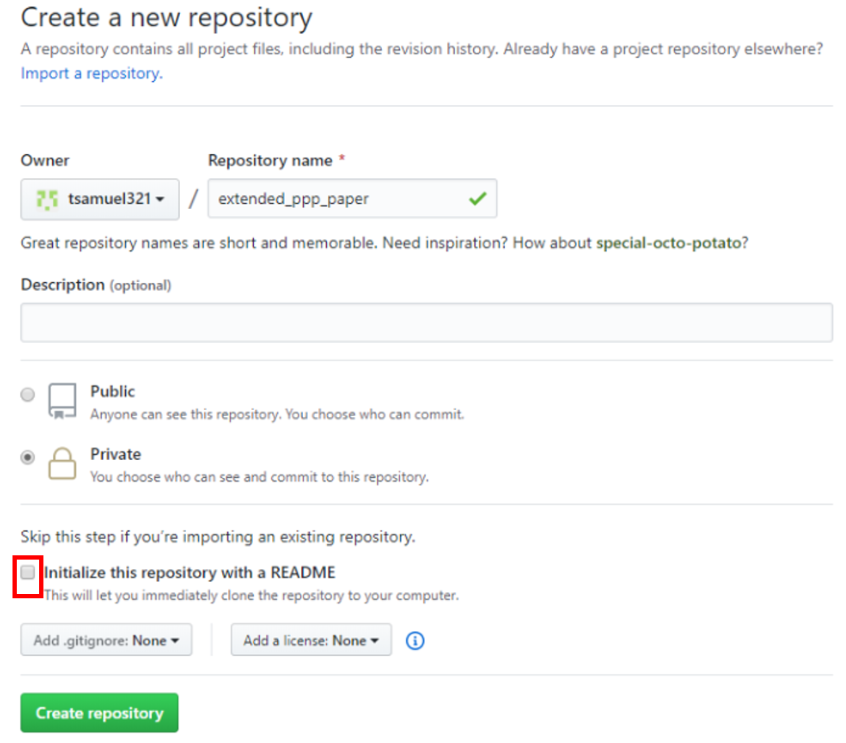
NB: Steps (1) and (2) should be done in GitHub, and the next steps should be done in SmartGit.
Go to Repository > Add or Create
Select a folder saved in your machine (e.g., dofiles_for_github).
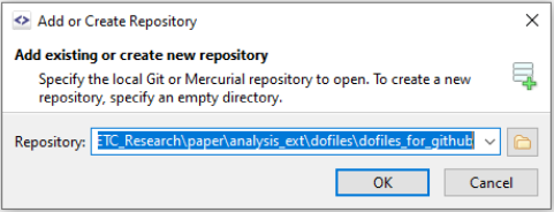
- Select Initialize.

Go to Local > Stage.
Select Stage.
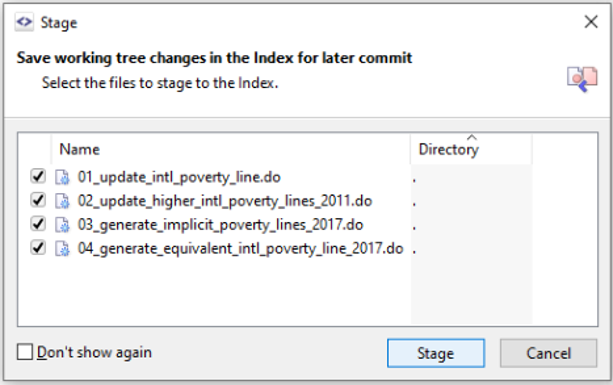
- Go to Local > Commit.
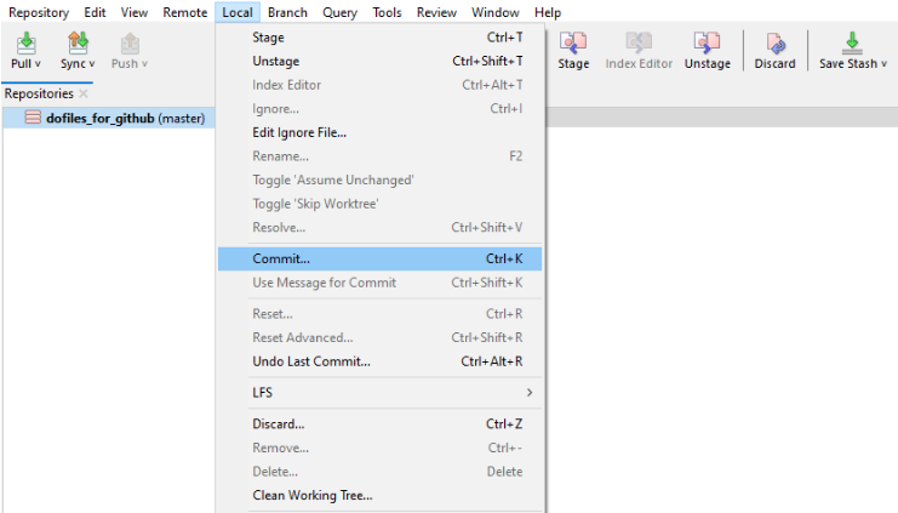
- Enter a commit message and hit Commit.
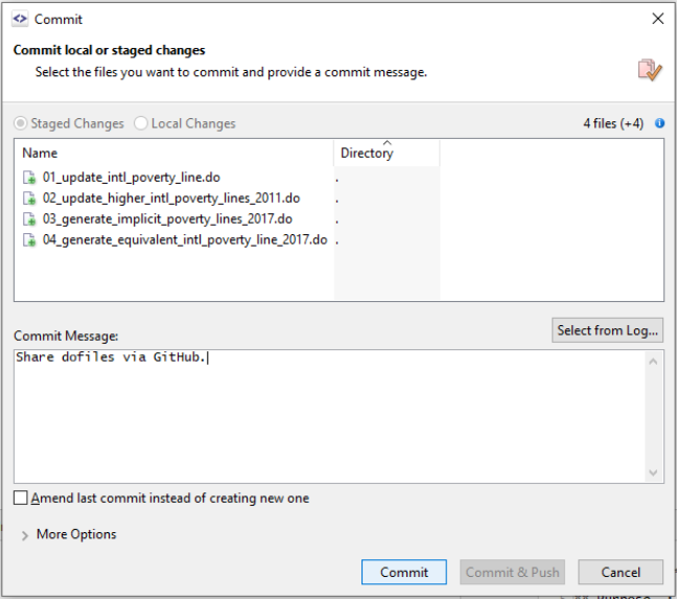
Go to Remote > Add.
Select the new GitHub repository that you created in Step 1.


- Add the remote repository.
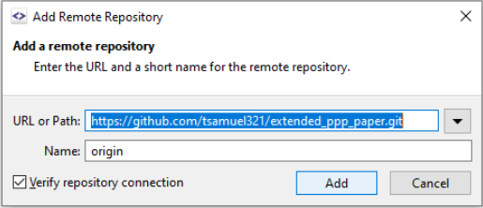
- Select master branch and origin.
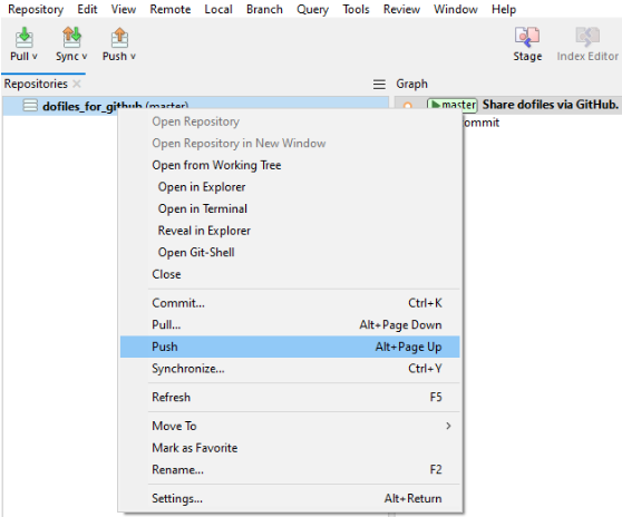
- Right-click repository you want to push to GitHub, and select Push.
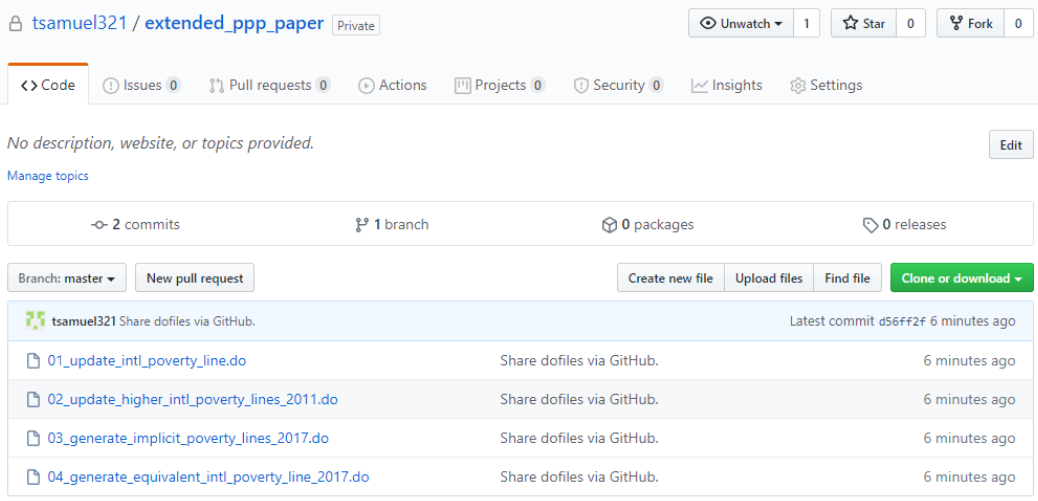
- Check if you have the repository on GitHub.
Basic Git process
- Stage
Use to prepare a commit. This command saves your file’s content from the working tree to the index.
Figure 3.4: Stage command
- Commit
This command saves local changes to your local repository. Each commit is accompanied by a commit message. It is good practice to commit your changes often in order to save them in the repository.Figure 3.5: Commit command
- Push
This command saves local commits to a remote repository hosted in the cloud, e.g. in Github. This is the key step for your work to be always backed-up in the cloud and accessible to other members in the team.Figure 3.6: Push command
- How to stage commit and push
First, let us take a look at the SmartGit interface.
Figure 3.7: SmartGit Interface
Now, let us see how to stage and commit a .do file.
Figure 3.8: Stage and commit a .do file
We can also stage and commit binary files (e.g. MS office files). However, Git will not track changes. This video also shows how to push your files to the host.
Figure 3.9: Stage, commit and push a file
- Pull
This command fetches commits from a remote repository and includes them into your local branch. You can pull from the remote repository clicking on the pull icon and selecting Pull in the window that appears on your screen:
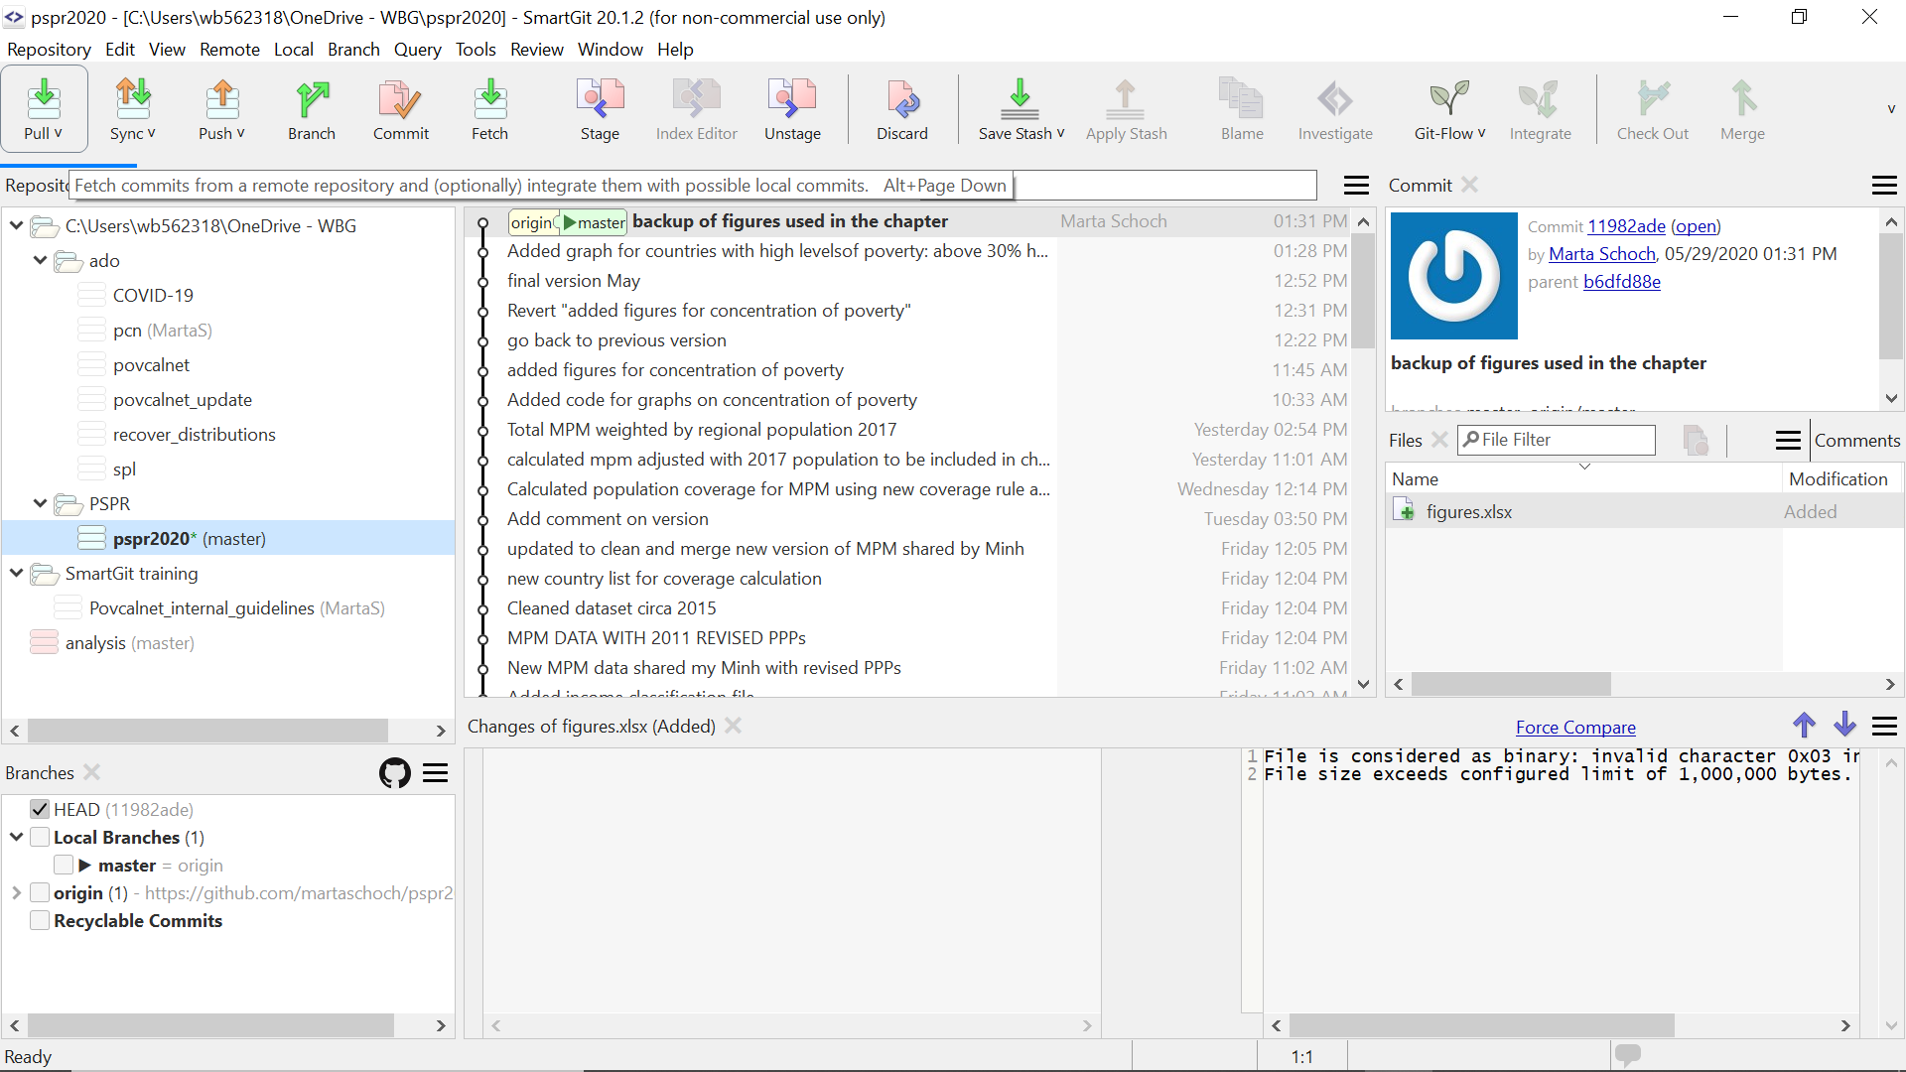
Figure 3.10: Pull icon
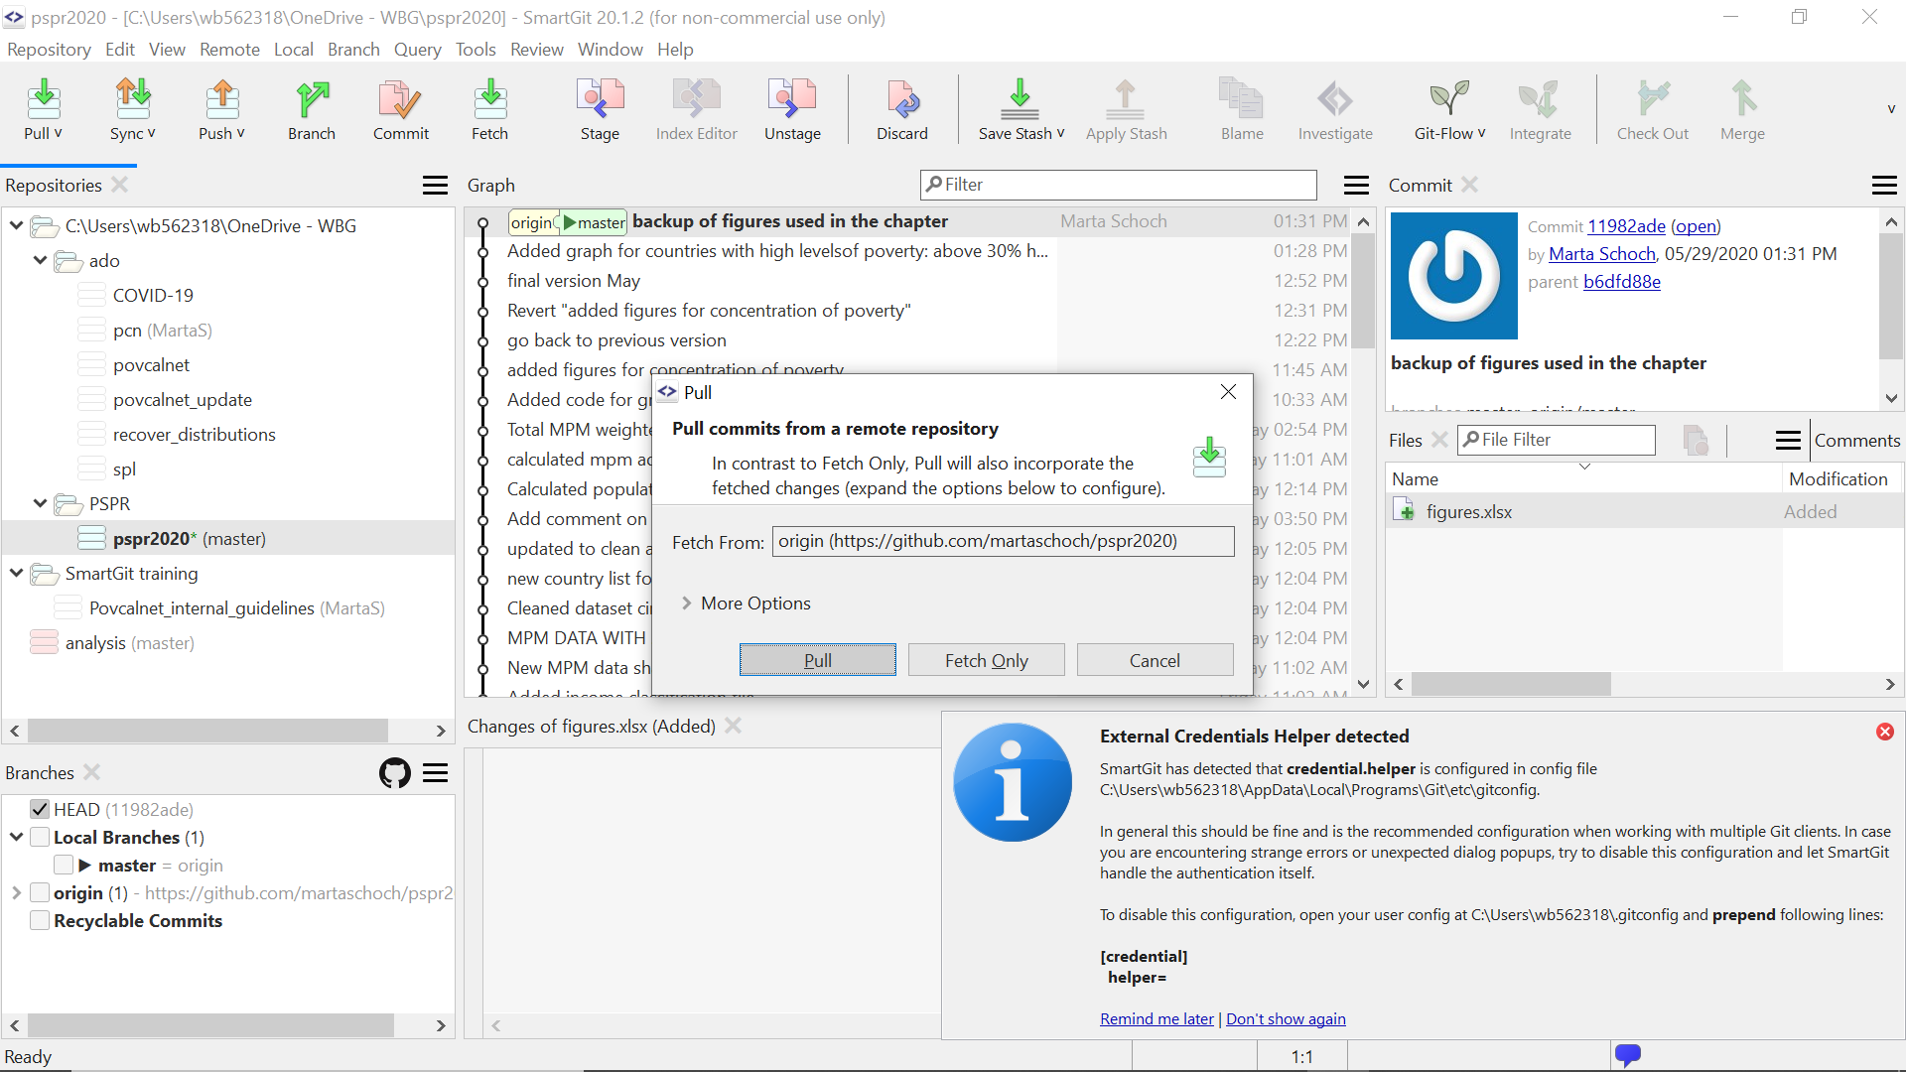
Figure 3.11: Pull or fetch only
Once you click on pull you should see a confirmation of a successful pull (unless there is a conflict, more on this later on).
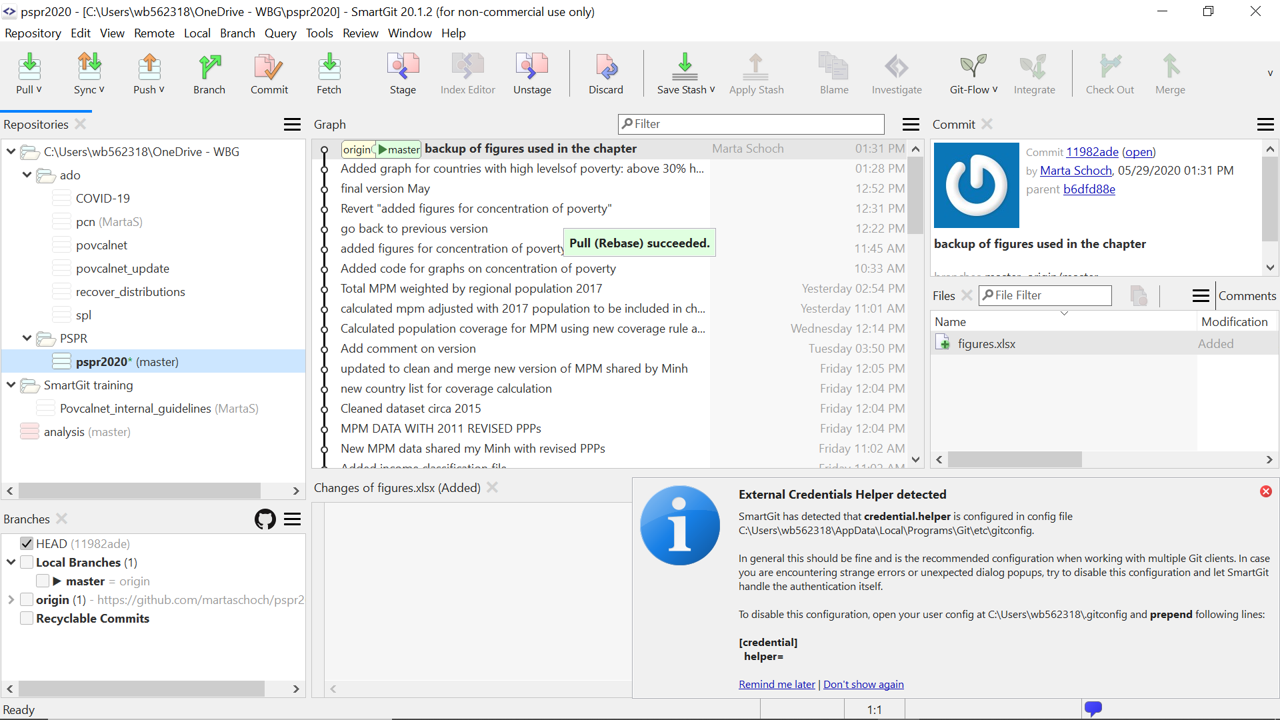
Figure 3.12: Successful (rebase) pull
- Create a new branch
Branching is a crucial step in collaborating with others in Git. You start a new branch to store your work independently from the master tree. Remember that in Smartgit you need to double click on your local branch to check-out: this simply means that you are making the selected branch your local one. You can see the steps to create and check-out your new branch below. We start from the simplest example. We cloned a repository with only the master branch (see in the Branches window):
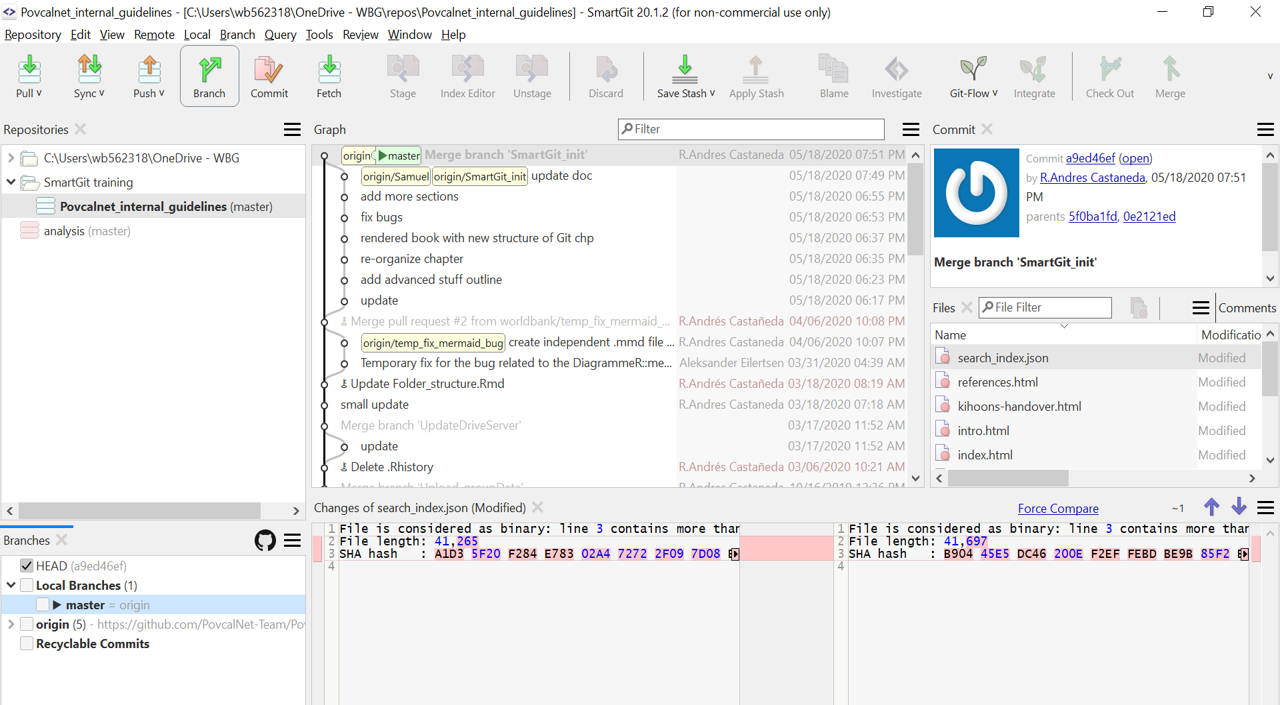
Figure 3.13: Master Branch
We now click on the icon:
Figure 3.14: New Branch command
SmartGit will ask you to give a name to your branch, in this case “MartaS” (Notice that it can actually be more efficient to name your branch after the task you are performing, e.g. adding section 3, rather than the name of the author as the same author might be working on more than a task) and click on “Add branch”:
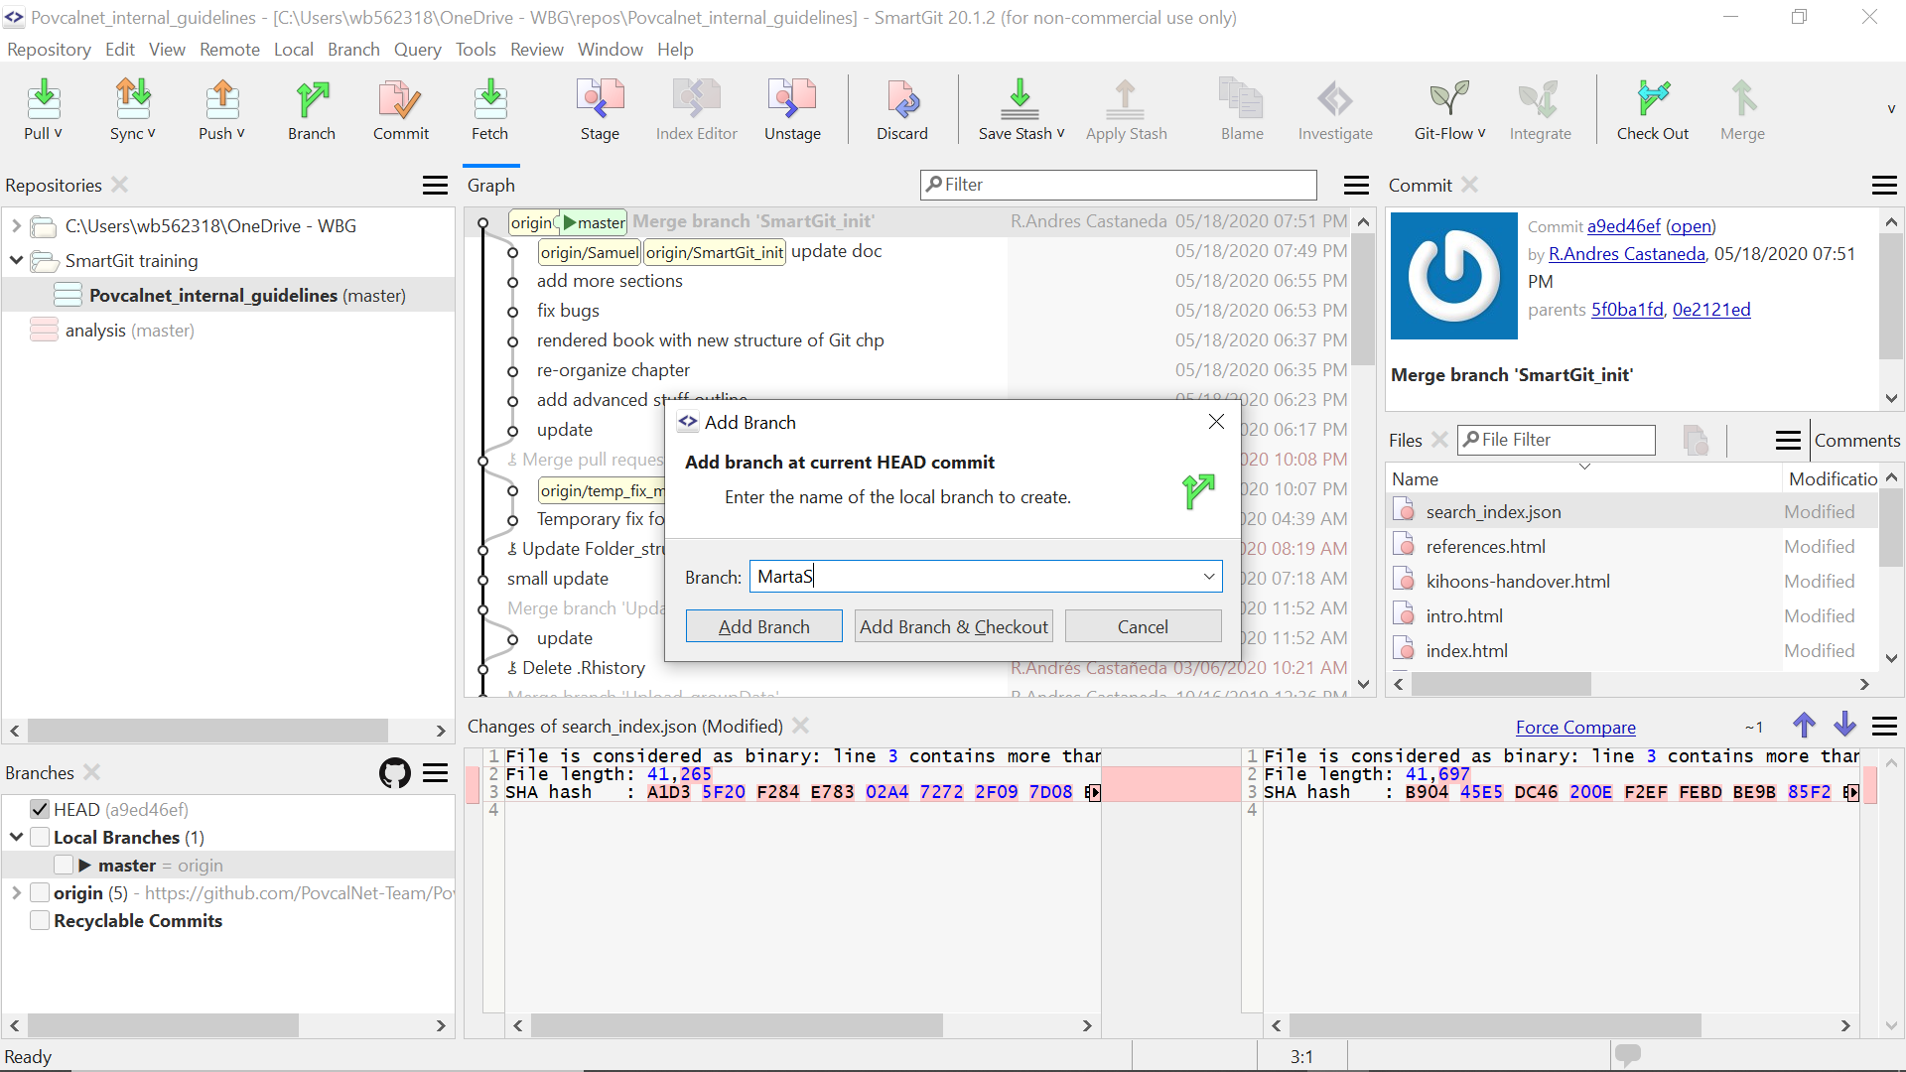
Figure 3.15: Add new branch
Remember we want to make sure that we are working on the “MartaS” branch (Working on the master branch might cause a lot of disruption especially if many people are starting their own branches from the master. Be careful!). Double click on the “MartaS” branch in the Branches window and this message will appear:
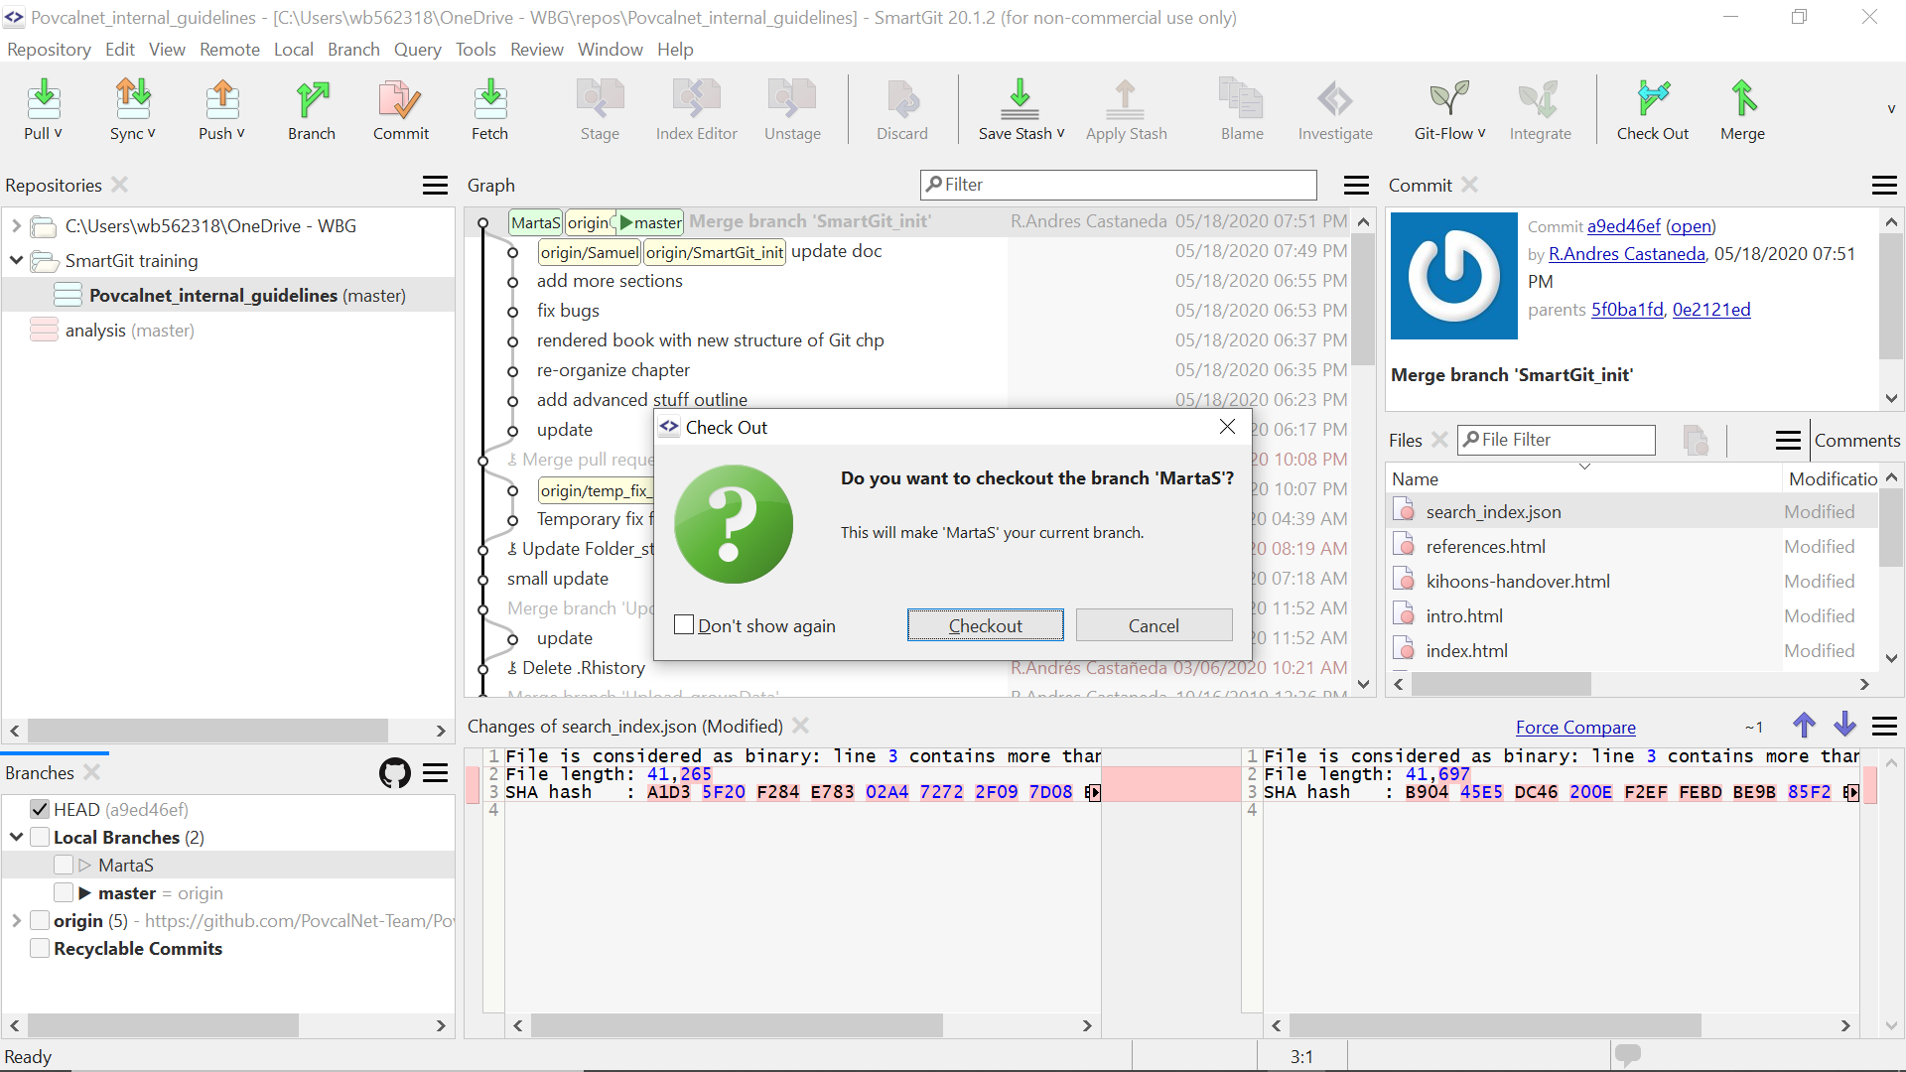
Figure 3.16: Checkout a Branch
After you click on checkout the “MartaS” branch will change to bold characters in the Branches window. You are all set and can start working on your task!
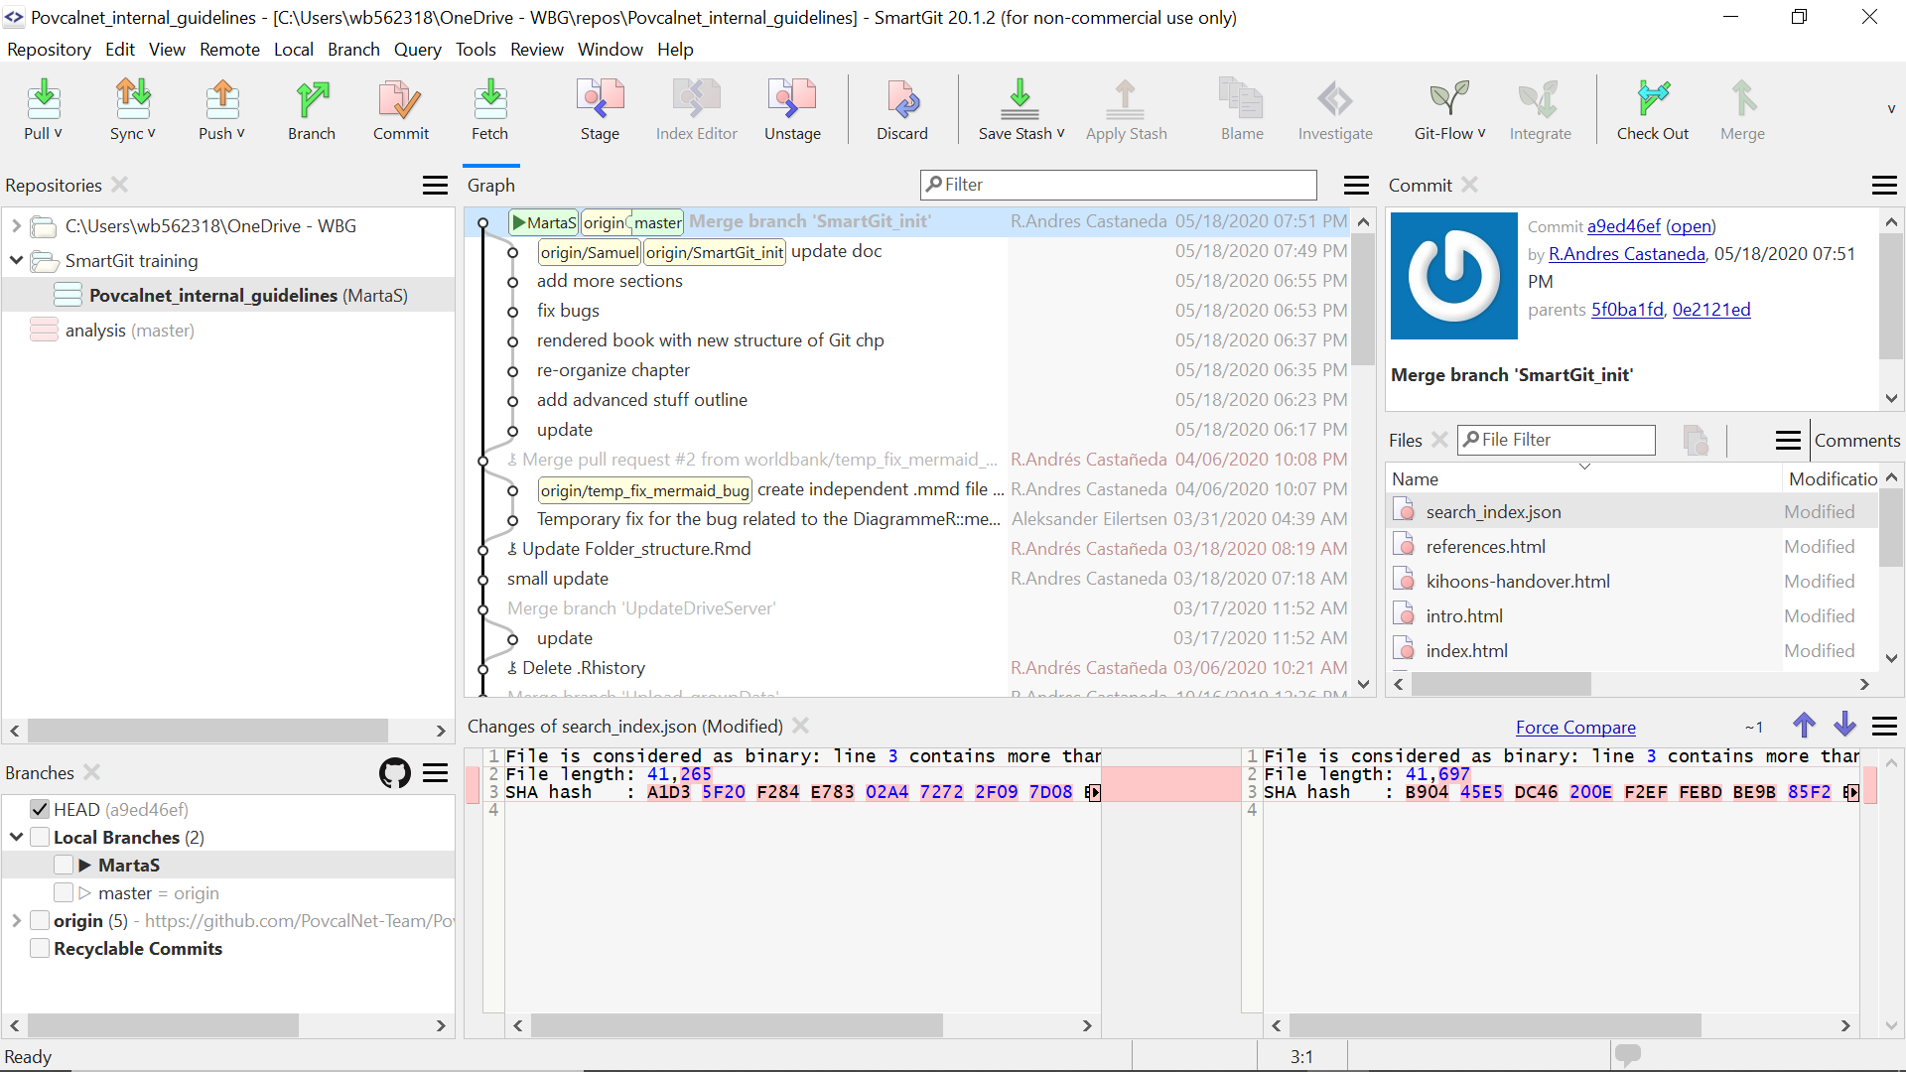
Figure 3.17: Local Branch changed from master to MartaS
All commits will be now saved to the branch “MartaS” and can be incorporated in the master branch after the person in charge of the repository resolves possible conflicts and decides to merge. More on this below.
3.5 Advanced Git process
3.5.1 Git workflow
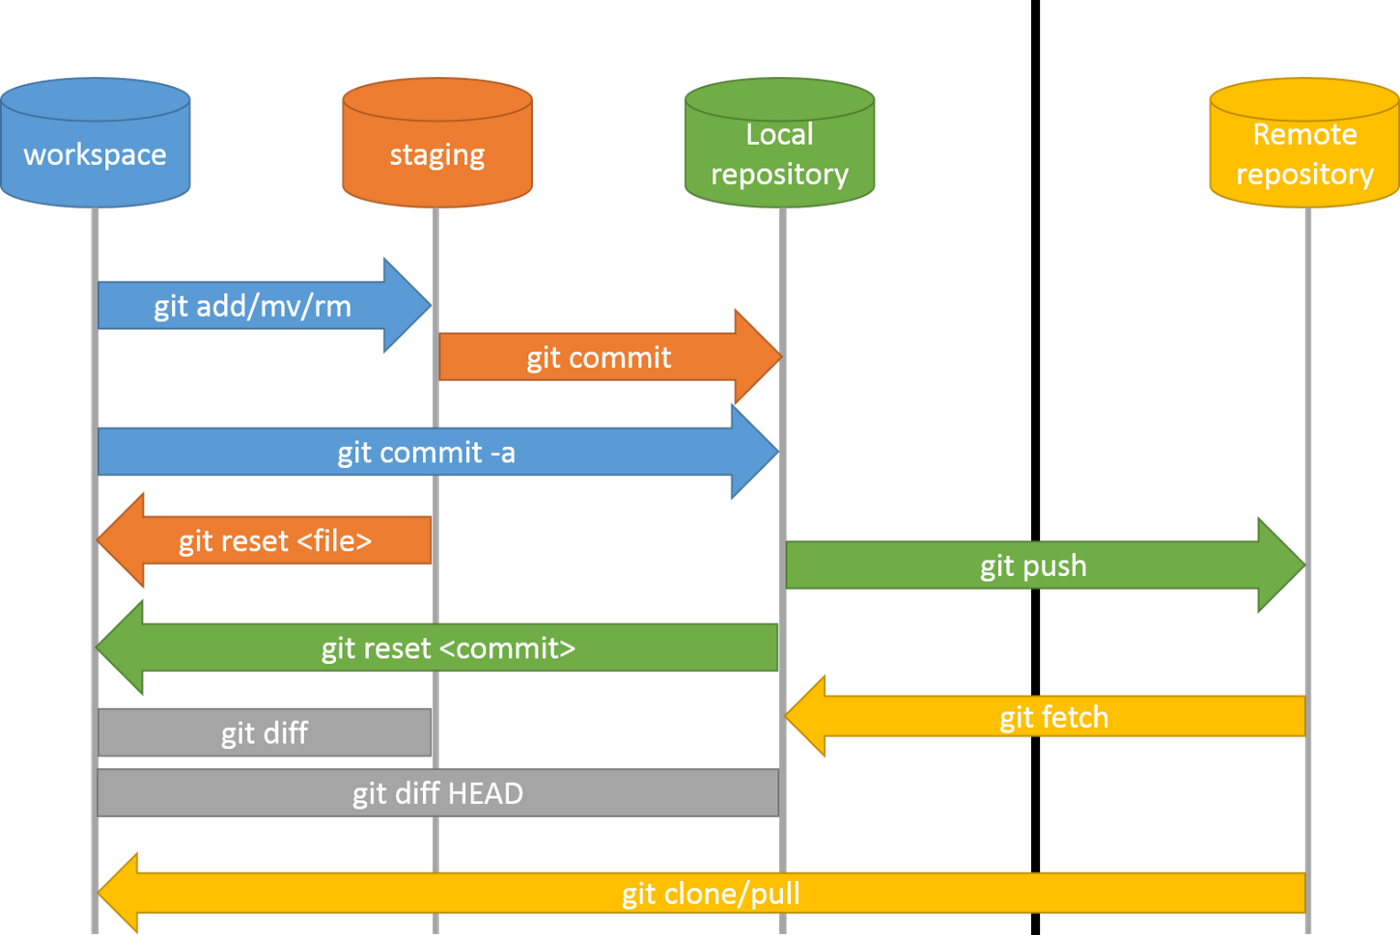
When working with Git it is important to be aware of the different steps of the Git workflow. The four different environments you can work with are 1) your workspace, 2) the staging environment (also know as the Git Index), 3) your local repository and 4) your remote repository (typically on the Github).
An overview of common Git commands and the typical Git workflow can be found in the picture below.2 Note that the commands shown here are the actual Git command line commands.3 The name of some these commands will be slightly different when you are using them in a GUI, like RStudio, GitKraken or SmartGit. But the workflow and process will be the same.
3.5.2 How to work with commits
- Commit best practices
One of the most important habits when working with projects in Git is to commit often and early. The reason for this is at a commit should only contain changes related to a single problem. If you discover a new problem, you should do a separate commit. This is much easier to achieve if you start out by committing changes early on in the project. It is of course also important that the commit solves the problem that it claims to solve, so doing an extra code check before you commit is a good idea.
- Stage vs Commit
Staging is a necessary pre-step before committing a change to your local repository. It does not however affect your repository in any significant way, and does not change your Git history. A staged file can be easily unstaged to remove it from your Git index.
A commit on the other hand saves changes to your local repository. This does affect your Git history. A commit can be reverted, but it is not as easy as unstaging a file. The general rule is to commit often, but make sure your code works before you commit.
- Writing commit messages
A good commit message should be concise, but also add the details necessary for people to understand what the commit does. This is particularly important when working on a shared project (but it could also be important for your future self!). Anybody should be able to look at your commit message and get an instant sense of why the commit was implemented.
It is important to start your commit message with a short one line summary of maximum 50 characters. This should preferably be written in the imperative. An example on how to structure a good commit message is given below (taken from this blog post).4
An example of a good commit message’s structure:
Summarize changes in around 50 characters or less
More detailed explanatory text, if necessary. Wrap it to about 72 characters or so. In some contexts, the first line is treated as the subject of the commit and the rest of the text as the body. The blank line separating the summary from the body is critical (unless you omit the body entirely); various tools like
log,shortlogandrebasecan get confused if you run the two together.Explain the problem that this commit is solving. Focus on why you are making this change as opposed to how (the code explains that). Are there side effects or other unintuitive consequences of this change? Here’s the place to explain them.
Further paragraphs come after blank lines.
Bullet points are okay, too
Typically a hyphen or asterisk is used for the bullet, preceded by a single space, with blank lines in between, but conventions vary here
If you use an issue tracker, put references to them at the bottom, like this:
Resolves: #123 See also: #456, #789
- Amend a commit
You can amend a previous commit if needed, for example if you made a significant typo and want to correct it or if you want to add a more detailed explanation to your commit message. You can also use amend to add more changes to a previous commit, but depending on how large those changes are you could also consider just adding a new commit. Note: It is important to not amend commits that you have already pushed to a shared repository.
3.5.3 What to do with changes you don’t want to commit
- Discard
If you don’t need your uncommitted changes and want to throw them away you can use Discard to do this. In SmartGit this can be done by clicking the below icon.

- Stash
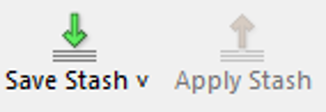
If have some uncommitted changes that you don’t want to commit, but still want to save them for later use you can use the Stash option. The two commands for this in SmartGit are “Save Stash” and “Apply Stash,” shown with the icons below. You can think of this as putting your changes in a box (with Save Stash) and then opening this box later if you need to (with Apply Stash).
3.5.4 How to undo stuff in the Git
- Unstage
This easiest “undo” operation in Git is to unstage a file you have previously staged (prepared for commit). This is useful if you realize that the file needs some more work before solving the problem or adding the feature you are working on.
Remember that it is always a good idea to check that your code is working before committing to your local branch. If you find an error at this step of the workflow just unstage the file. In SmartGit this can be done by clicking the below icon. Note however that unstaging will not help you if the commit has already been made.

- Reset
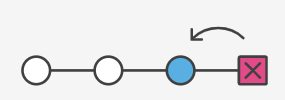
Reset is one of the options available if you want to undo changes in Git. It can be used to either reset files in your staging index (this is the same as unstage) or resetting commits in your local repository.
Reset can however be a complex tool to use. There are important differences between doing a soft, mixed or hard reset. Particularly a hard reset can be dangerous since it involves resetting your staging environment and working directory to specific commit (a point in time on your Git history tree). This implies that any pending work in your index and working directory will be lost. It therefore important to be careful when using Git reset on your commit history, and to read up on the different options before doing so.5
It is very important to never use Git reset on a commit that has been published to a shared repository. When a commit has been pushed to a shared repository you should always assume that your colleagues relies upon this change. If a commit is removed from the project’s shared history this can create serious and unexpected problems when syncing different branches. Therefore; If you find yourself in a situation where you want to undo a commit that has been pushed to a shared repository you should always use Git revert, not reset. In general revert can be seen as a safer option (see below).
- Revert

Revert is another option for undoing changes in Git, although it is not a traditional undo operation. A Git revert inverts the changes introduced by a commit and appends a new commit with the resulting inverse content, as illustrated by the figure above. This is what makes the revert operation safer than a Git reset. By adding a new commit revert ensures that all the project’s history is kept in place.
This is also why Git revert should always be the preferred option when reverting a commit that has been shared with others. As mentioned above you should never modify or delete published Git history, something which Git revert nicely avoids.
An other important difference between revert and reset is that revert is able to target an individual commit at an arbitrary point in the history, whereas reset can only work backward from the current commit.6
You can use the following button in SmartGit to initialize a revert process.
3.5.5 How to deal with merge conflicts
- What is a merge conflict
Conflicts are usual, and you should not worry if you encounter one. Conflicts regularly arise when the same file was changed in the same line, customarily by two different collaborators. Given a conflict git is unsure of which version is the correct one, and is up to the person carrying the merge to select it. Notice that the solution can be a particular version of a file or a combination of the conflicting versions. The collaborator caring out the merge is responsible for solving the conflicts.
- Solve merge conflicts
Thanks to git UIs as SmartGit or GitKraken solving merge conflicts is easy. When caring a merge using one of this UIs, if a conflict appears the process will be paused and you’ll get notified that the file has a conflict. These UIs have a conflict solver, that will show you both versions of the file allowing you to either select the one to keep or to select line by line what to keep of each one, solving the conflict. In case you need so you may also stop the whole process.
The same can be done using Git command lines, although not covered here, If you’re interested you can find more on this here.
- How to avoid merge conflicts
Some general workflow advice on how to avoid merge conflicts is to always have a separate branch for each issue, only one author per branch and also to create a pull request with a reviewer before the branch is merged to master.
3.5.6 How to work with pull requests
Working with Git is meant to be a collaborative experience, both dynamic and efficient. Pull requests are a powerful and crucial tool in such aspect.
Pull request can be thought as embed way to let know others about changes you have pushed in a repository’s branch. Once a pull request is opened, the chance to engage a discussion about the changes pushed takes place; where collaborators are welcome to share thoughts, concerns and ideas before the changes are merged. In the case you expect input from a particular collaborator you may add a designated reviewer; in many occasions, the reviewer is also the person in charge of the destination branch and will be the person that will ultimately carry the merge.
This is how a pull request looks in Github:
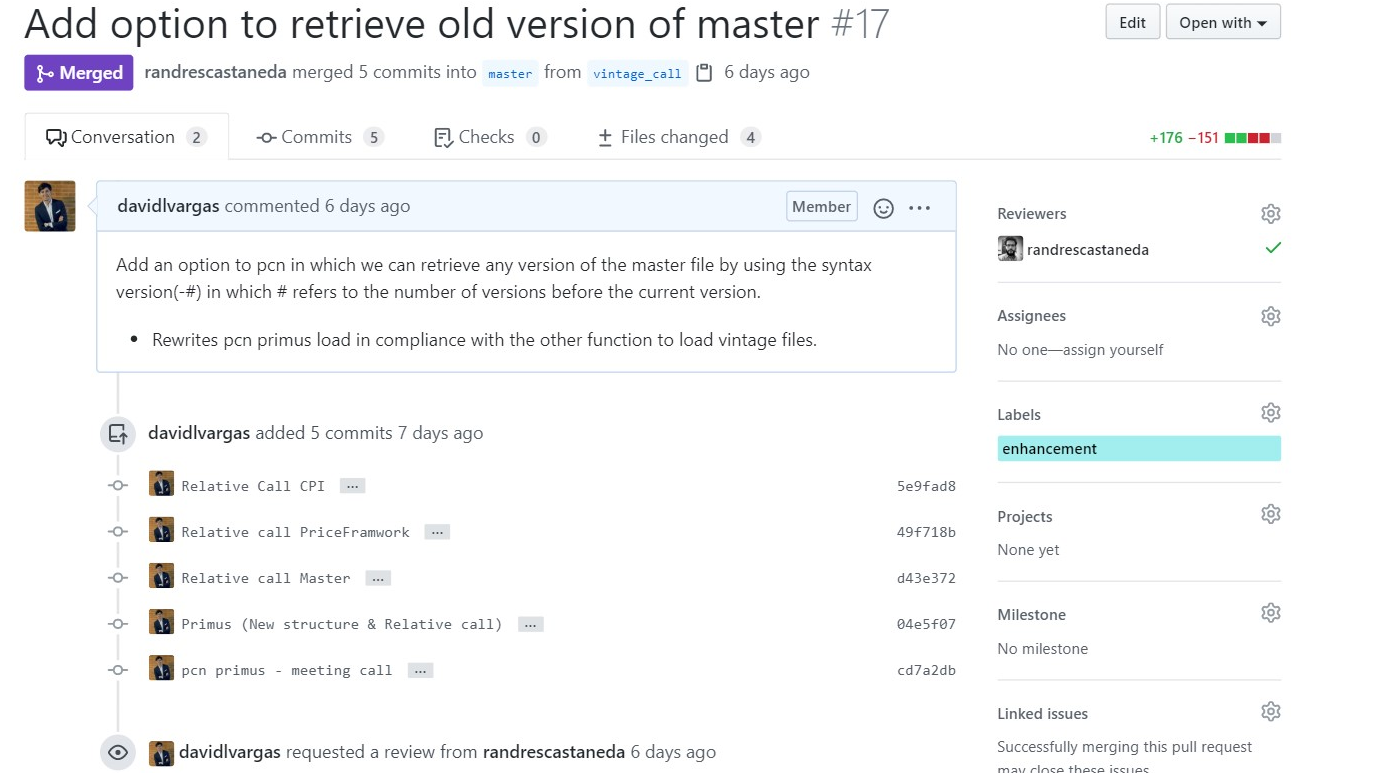
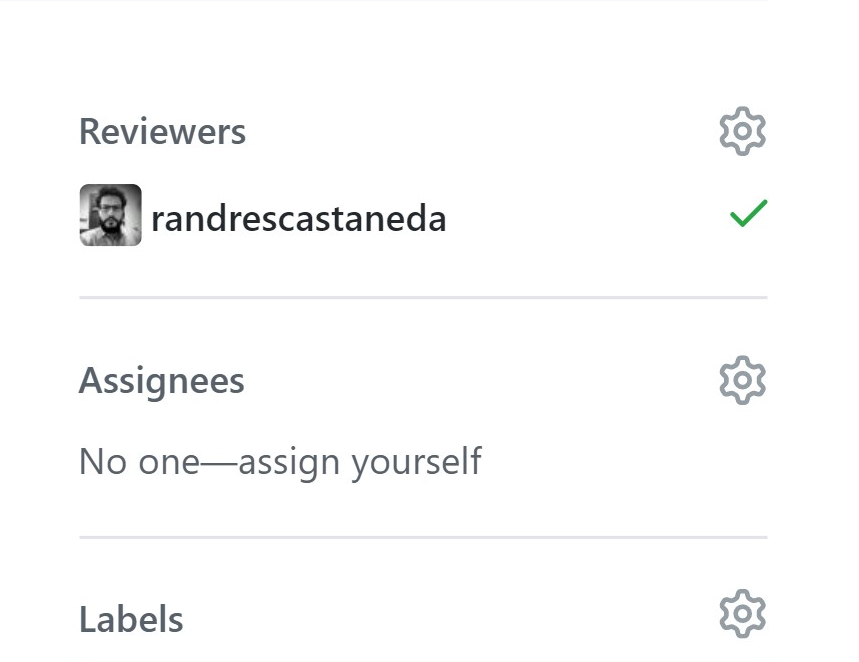
Notice that this contains a title and a message clearly stating the nature of the request/feature. Moreover in this case a reviewer is designated:
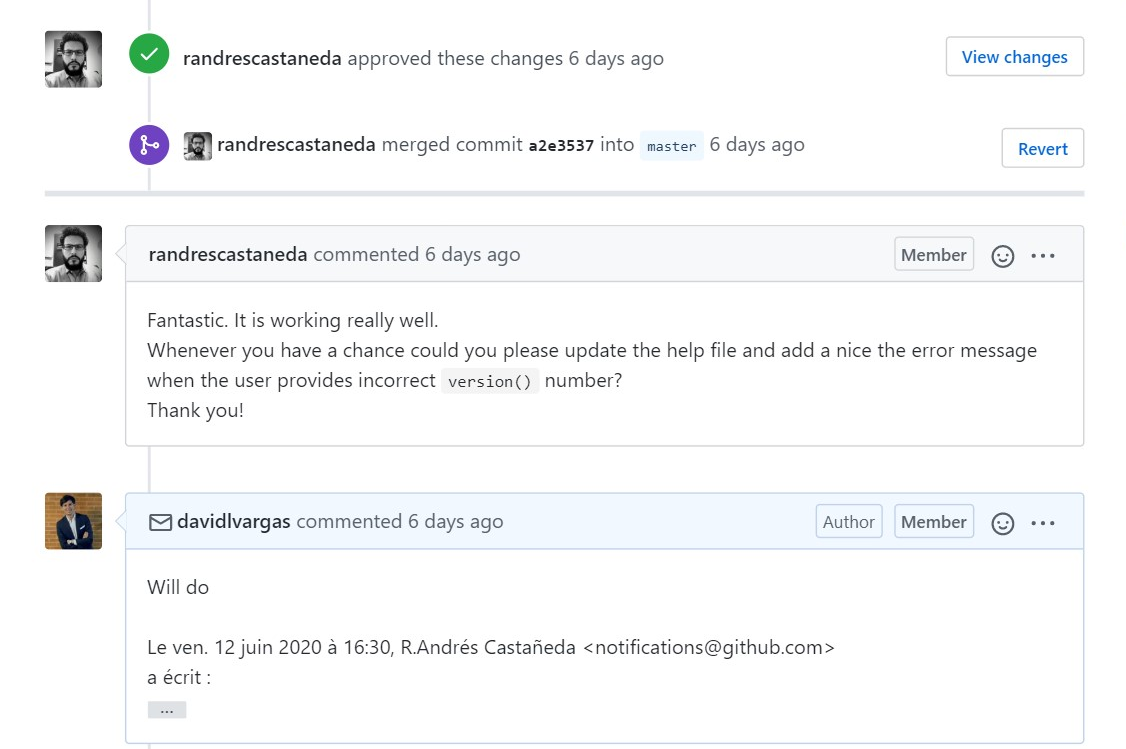
The reviewer evaluates the changes approves them and merge the new features to the master branch, in this case. Also remark that a fluid conversation between reviewer and the collaborator arises.
- Creating a pull request from SmartGit
Figure 3.18: Pull request in SmartGit
- Issues
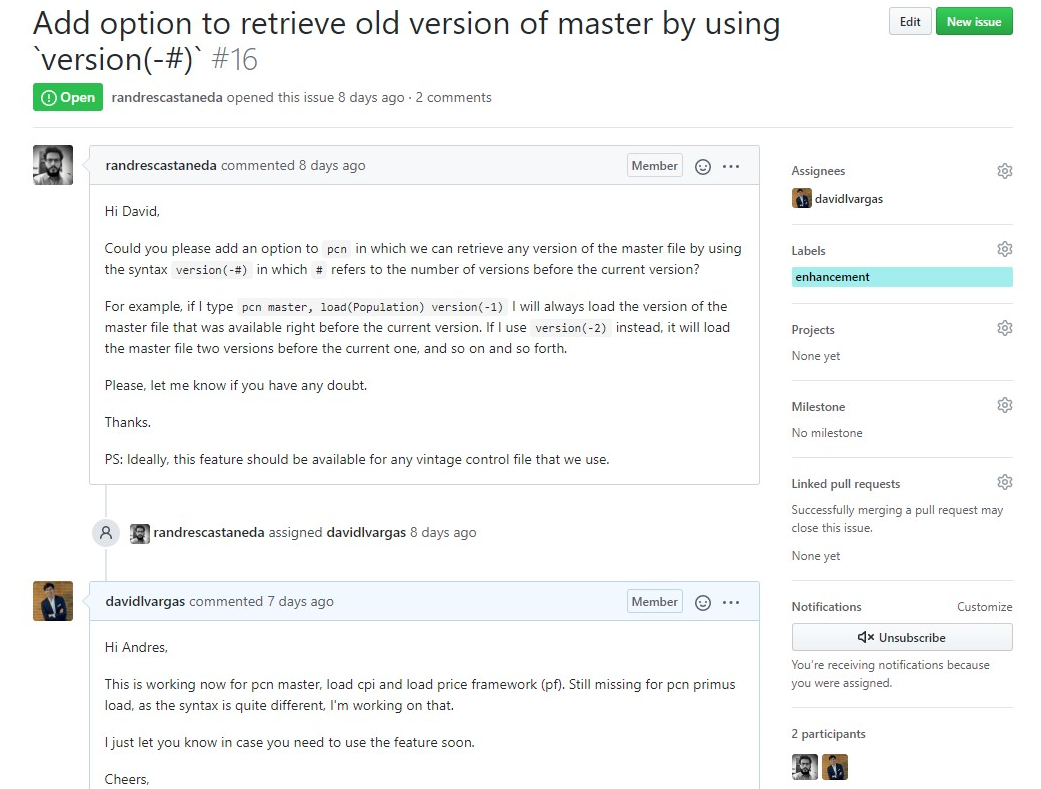
Similar to pull request issues is a powerful collaborative tool of Github. An issue works both as a way to assign people to tasks and a forum where people can discuss them.
An issue must have a title and description of the topic to tackle, and usually has labels to help to categorize it, at least one assignee in charge of working on it, and a comment section where the team members can interact. An issue looks something like this:
3.5.7 DO’s and DONT’s
Do’s:
- Do commit early and often
- Do check that your code works before you commit
- Do write informative commit messages
- Do create a new branch before you start working on a new issue
- Do create a pull request before merging your branch to master
- Do add a reviewer to your pull request
- Do delete branches when the issue has been solved (i.e. branch has been merged to master)
- Do keep up to date (take note of other changes in the repo, e.g. use pull rebase)
Don’ts:
- Don’t work directly on the master branch
- Don’t create a pull request addressing multiple issues
- Don’t add binary (or other large files) to the repository
- Don’t commit files that contain usernames, passwords or other credentials
- Don’t modify or delete the published Git history
- Don’t do a force push (unless absolutely sure about what you are doing)
- Don’t panic :)
3.6 Getting to know GitKraken
Even though Git was originally thought to be executed at the command line, there are several GUIs that ease your interaction with Git and get you excited about it. Yet, keep in mind that “most of the GUIs implement only a partial subset of Git functionality for simplicity. If you know how to run the command-line version, you can probably also figure out how to run the GUI version, while the opposite is not necessarily true. Also, while your choice of graphical client is a matter of personal taste, all users will have the command-line tools installed and available.”7
Among the GUIs available, we thinkg GitKraken is the best one to get you started. However, if you’re interested on learning Git at the command line, we recommend the book Pro Git by Scott Chacon and Ben Straub, which is available online for free.
The best place to learn everything about GitKraken is the GitKraken Support webpage. However, bellow you will find the most basic things that you need to know about it and, when considered necessary, you will find either reference links for more detailed information or embedded videos. For instance, the video bellow shows the basics of GitKraken.
Figure 3.19: Introduction to GitKraken
GItKraken Interface
Figure 3.20: GitKraken Interface
Figure 3.20 presents the GItKraken interface, which has four main components.
The Toolbar shows the most common actions in repositories. In our case, we will focus on pull, push, and branch.
The Left reference panel shows properties of your repository. In this panel you can see what branches are stored in your local computer and which in the cloud (i.e., remote repository). You may use it also to know whether you’re ahead or behind any specific branch.
The Commit panel at your right is where files and changes from your working directory are being watched (i.e., tracked). In this panel you may can see whether a particular file has been modified (orange), deleted (red), created (green) or renamed (blue) with respect to the previous commit. Also, you can see the state of your files with in your current commit. That is, you may know whether each file is staged or untagged.
Figure 3.21: color guide for file symbols
- The commit graph is the core of your repository’s development and a representation of the Directed Acyclic Graph. As explained in the GitKraken documentation, “[e]ach row of the graph represents one commit, and the top is always for the latest changes. An interactive //WIP (Work-In-Progress) node will show if the working directory has changed since the last commit. Branches and tag labels on the left side of the graph are pointers to specific commits, and each vertical column represents a branch currently available on the repository. Columns can intersect through merge commits as shown in the graph legend. As also shown, multiple branches can be at the same place of a single commit and can be both local and remote.”
Figure 3.22: Nodes meaning
Create a repository
In Git, a repository refers to a folder with all the files and sub-folders of a project. In other words, it refers to the folder of a project. It is possible to create a git repository in an existing project folder, but it is recommended to initialize a Git repository before you start working on your project.
Open GitKraken and click on the folder icon at the upper-left side of the screen and then click
Init. Alternatively, you could go tofile -> Init repo, or use the shortcutCtrl + I.Given that we are going to be working with GitHub, click on the icon
GitHub.com.Select your account in case you have more than one GitHub account.
Provide a name for your repository. The name cannot have spaces.
If you want, add a description of the project.
Select Public or Private repository. Keep in mind that if you have a free GitHub account:
- You can have unlimited public repositories with unlimited collaborators.
- You can have unlimited private repositories with no more than three collaborators. This is very inconvinient for large teams like PovcalNet.
Check the box
Clone after initSelect the folder in your computer where you want to clone the repository. Make you do NOT create a folder for the repository because Git will created for you using the name provided in step 2.2. You only need provide the root folder.
Do not do anything on the field
Full Path. It is just for your information.Do not select anything on
.gitignoreyet. We will cover that below.If you are creating a package or a document that must be cited if used, select
MIT license-
leave unchecked the box
initialize with LFSYour screen should look something like this:Figure 3.23: Initialize repo
Once you have create your repository, make sure to open it and initialize it.
Clone a repository
If you want to contribute in an existing repository, you can do it as an existing collaborator or as an external user. If you’re an existing collaborator, you can create branches, commit and push your work into the main repository. If the repository is hosted in a free Github account, you are even able to merge your branch into the master branch. However, if the repository is paid (PRO) license in GitHub, the owner of the account may set restrictions to collaborators and branches. In the second case, if you are an external user of the repository, you can’t push your work into the original repository but you can fork it (which is making a copy of the repository into your account), modify it as you consider necessary and make a pull request.
In order to contribute into any of the PovcalNet repositories you must be an existing collaborator. Thus, in this section you will learn how to clone a repository.
- Go the to the repository you want clone in GitHub.
- Clik on the green button “Clone or download” and copy the whole url.
Figure 3.24: GitHub link to clone repo
Go to GitKraken and click on the folder icon at the upper-left side of the screen and then click
clone. Alternatively, you coul go tofile -> Clone repo, or use the shortcutCtrl + N.Select the Github.com icon
Select the folder where the repository is going to be cloned
Select the repository from the menu.
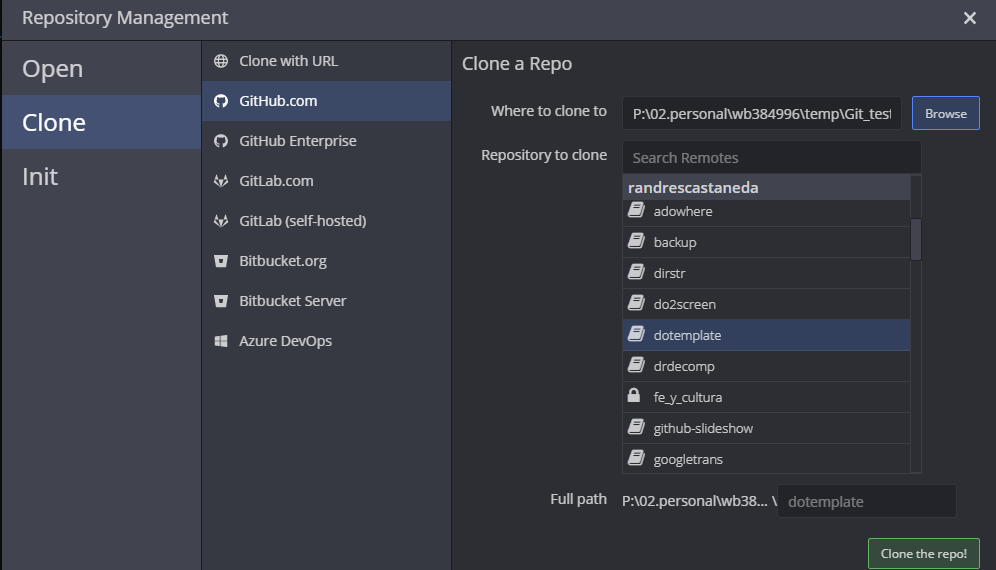
Figure 3.25: Clone repo in GitKraken
Working with commits
A commit is a snapshot of your project but, as you work on it, you’re able to decide how the snapshot would look like. You can select what parts or files of your progress will be committed (or snapshotted) and even select what file are not going to be tracked in your progress. All of this is done as follows:
- Once your files have been modified (Fig. 3.22) and saved, GitKraken identifies them as work in progress (//WIP) and shows you the details in the Unstaged file box.
Figure 3.26: GitKraken Work In Progress
By clinking in the name of any file in the commit panel (Fig. (fig:GKinterface)), the commit graph will be replace by the GitKraken diffs interface which shows what was added or removed from a file. Red is for lines where content was removed whereas green is for new lines added.
You can select [1] all the files, [2] some of the files, or [3] even some hunks within each file to be stage. Your select will compose the next commit. If you decide you don’t want make a staged file part of your next commit, you can unstage it.
Record your commit message for the staged files to the repository. In Summary you include a brief but meaningful message supporting your commit. This text will appear in the graph and is mandatory. In Description you may add extended message to provide more details behind the changes.
Click Commit changes
You may repeat this process as many times you want. When you’re ready, you may push your work to the remote repository into your own branch.